DIY Switches
Create an adaptive switch that works for you
A switch provides an alternative way to interact with a computer, tablet, toy, or other electronic device. A switch can be activated by pressing, squeezing, touching, tilting, or using another movement that works for the user. Commercial adaptive switches are widely available, but they can be expensive, often costing $75–300 per switch. The Switch Kit makes it possible to create effective, customizable switches using inexpensive materials and basic tools. The Switch Kit can also be used with any compatible commercial adaptive switch. You can mix and match commercial and DIY switches based on what works best for the user.
How does a switch work?
At its simplest, a switch acts like a drawbridge for electricity. When the switch is not activated, the circuit is open and electricity cannot flow. When the switch is activated, two conductive points come into contact. This closes the circuit and allows the Input Device to detect the switch press.
The basic DIY switch
Most Switch Kit switches use two simple components:
- Conductive material, such as aluminum foil tape or conductive fabric
- A mono audio jack cable to connect the switch to the Input Device
The exposed wires from the audio jack cable are secured between layers of conductive material. When the two conductive surfaces come together, the circuit is completed.
Safety note: The conductive materials used in these switches are connected to the low-current, low-voltage inputs of the Input Device. They are designed for human-touch interaction and do not present an electrical shock hazard during intended use.
Explore the Switches
The Switch Kit includes several DIY switch designs. Each uses the same basic electrical principle but provides a different way to activate the circuit.
Choose a switch based on the user’s movement, strength, positioning, preferences, and the activity they want to control.
Paddle switch
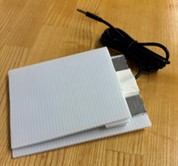 A large lever-style switch activated by pressing down on a paddle. Good for: Large movements and users who benefit from a large activation surface.
Foam noodle switch
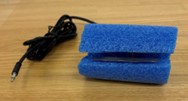 A soft, lightweight switch made from a split foam tube such as a pool noodle. Good for: Squeezing or grasping movements and users who prefer a soft activation surface.
Tap switch
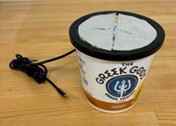 A low-force switch activated by touching two conductive surfaces simultaneously.
Good for: Users who can make a controlled touch but may have difficulty applying physical force.
> **Note**: The Tap Switch uses the conductivity of the human body and is only compatible with devices designed for human-touch interaction, such as the Makey Makey.
A low-force switch activated by touching two conductive surfaces simultaneously.
Good for: Users who can make a controlled touch but may have difficulty applying physical force.
> **Note**: The Tap Switch uses the conductivity of the human body and is only compatible with devices designed for human-touch interaction, such as the Makey Makey.
Feather switch
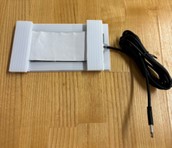 A lightweight switch designed to respond to small movements. Good for: Users who benefit from a sensitive, low-force switch.
Soft switch
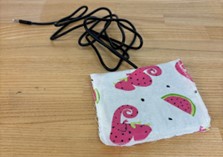 A compressible fabric switch that activates when pressed. Good for: Users who prefer a soft surface or need a larger, more comfortable activation area.
Tilt switch
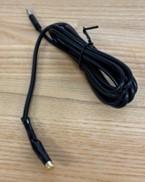 A sensor-based switch that activates when its orientation changes.
Good for: Users who can control a head, arm, or other body movement but may not be able to press a traditional switch.
A sensor-based switch that activates when its orientation changes.
Good for: Users who can control a head, arm, or other body movement but may not be able to press a traditional switch.
Build your own switch
Most of the DIY switches can be assembled in less than 15 minutes using inexpensive, readily available materials and basic tools.
Common tools
- Scissors
- Box cutter
- Hot glue gun
- Wire strippers
- Basic hand tools
Common materials
- Mono audio jack cable [example]
- Conductive tape [example]
- Double-sided permanent foam tape [example]
Instruction manuals
Alternative access to switch instructions PDF.
Make it your own
These designs are starting points, not finished products. Switches can be modified to change their:
- Size
- Shape
- Color
- Texture
- Activation force
- Activation movement
- Position
- Mounting method
For example, the paddle switch can be decorated with stickers, felt, colored duct tape, or textured materials such as bubble wrap. Adding visual or tactile features can make a switch more engaging and easier to locate.
Positioning your switch
Finding the right location for a switch can be just as important as building the switch itself.
Try adding:
- Non-slip materials such as Dycem or grip tape
- Velcro for removable mounting
- Suction cups for smooth surfaces
- A bendable phone holder for adjustable positioning
Experiment with different locations and orientations to find a setup that works comfortably for the user.
Troubleshooting
If a switch is not working, start by checking the electrical connections.
Check the conductive tape
Make sure the exposed wires are firmly secured between the conductive layers. Press down firmly around the connection to ensure good electrical contact.
Check the audio connection
Make sure the mono audio jack is fully inserted into the Input Device.
Check the switch activation
Make sure the two conductive surfaces can come into contact when the switch is activated.
Try another port
Connect the switch to a different port on the Input Device to determine whether the issue is with the switch or the connection.